Showing posts with label Grow your own products. Show all posts

Wednesday, January 21, 2015

Sweet Pinot Noir Pepper


You read that right, a Pinot Noir Pepper.

No it is not wine that tastes like pepper, or a pepper that tastes like wine. It's a delicious produce that all will surely enjoy! 

We grew this variety for the first time last year and the plants flourished. If you are looking to add a new pepper to your garden, you should give this one a try.

The pepper begins in a light green hue when young and matures into a variety of colors; including berry, citrus, and cherry red (though my crop mostly grew berry with a few reds). The size of the peppers vary, I had both big and small ones. If you would like to grow mostly large ones, the peppers can be thinned. 

It does very well in slightly hot weather, but as soon as it gets over 100 degrees Fahrenheit the crop slows down slightly. The peppers continued to produce well into December and only stopped because we finally got a frost!


When cooked the flavor feels hot, but does not have that spicy kick. This appeals to me since my taste buds cannot handle the spiciness. 

You can purchase the seeds at Burpee's Seeds and start them at home! 

We highly recommend this variety; it will soon become a staple in the your Summer kitchen. Pinot Noir peppers add great flavor to omelets, fajitas, quiches, pizzas, stir fries, and anything else you can think of! 

Hope you give this pepper a try! 

Nancy Jane

Monday, January 19, 2015

The Jiffy Tomato Greenhouse Review


Months ago Mother Judith remembered my dream of having a beautiful greenhouse. She granted my wish with a mini greenhouse; I thought it was so funny and so useful!


Finally seed starting time has begun for my zone (perhaps we're a little early, but we just can't wait). I am use to starting seeds in egg cartons, so I felt a bit fancy shamncy beginning my little ones in this product. Nonetheless, the mini greenhouse is great for gardeners of all levels and couldn't be easier!

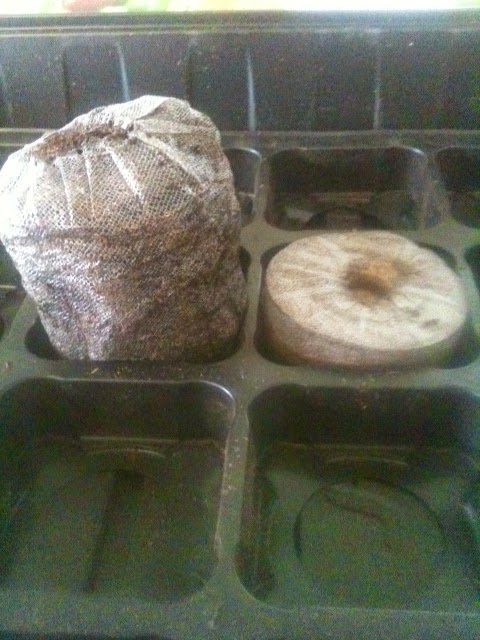
Product Detail: Jiffy Tomato Greenhouse. It contains 36 peat pellets, a large plastic tray holds 36 pellets and a rectangle dome lid. The tray and lid act as the greenhouse. The peat bricks expand once soaked. You can find them at Walmart with various size options, from 25 to 70! 


First, you need to submerge the peat pellets in water for about 30 minutes in a separate container and wait for them to expand. Be sure to check the water level often; before you know it the water will be absorbed and your little pellets will not have any water left to soak in. 


When finished, you will find the peat soft and luscious; a perfect atmosphere for your little seeds to grow in. If the top of the pellets are still a little stiff and crumbly, you'll need to soak it a little longer. And the size it grows to is quite shocking compared to where it started!


After this step is done, place lose pellets back in container. Pull back netting, poke the seeds in, and cover with peat. Place the dome lid over plastic container, and wait for them to grow! I have a multitude of tomatoes growing that were only planted 5 days ago!


Here are the ups and downs I've experienced with the mini greenhouse

Upside:
  • Easy to maintain while seeds are growing. The peat keeps moisture very easily, thus minimal watering.
  • Peat keeps an optimum seed starting atmosphere.
  • Easy to tell when watering is needed; the pellets will no longer be black but light brown.
  • Minimal mess when planting. The peat does not get all over the place.
  • No extra equipment needed, all is provided for you (except seeds and containers to soak bricks in).
Downside:
  • When you place the lid on top of container for multiple days, the water does not evaporate easily and it sits in container. Fungus will begin to build up on pellets, so frequent fungicide spraying is necessary. Another remedy is to let the green house sit open to air out for a few hours.
  • Time consuming. Unlike other methods where you easily scoop soil into cartons, these take a while to prepare.
All in all, it has been a good experience using the mini greenhouse. I would recommend it for the well seasoned gardener to the first time seed starter! 

Nancy Jane

Saturday, January 17, 2015

Johnny's Seeds Herb Disk Collection


New product trial; Johnny’s Seeds Herb Disk Collection. Each disc has herb seeds of your choice strategically placed on a cloth like disc.


The disks can be purchased separately or with the proper size pot.

They offer:
  •  Cilantro/Coriander
  •  Chives
  •  Parsley
  •  Thyme
  •  Genovese Compact Improved Basil
  • Arugula
Simply place the white disc on top of seed or potting soil. 

Using the pots Johnny's Seeds sells, we fill ¾ way with potting soil, a couple inches of Burpee Brick seed starting mix, place the discs in pots, top with vermiculite, and sprinkle with more Burpee seed starter.


At Gray’s Farms we get planting fever in January, so we started ours early and keep the seeds cozy with warming mats. However, if you are in hibernation mode wait until spring to plant.

Either way, now is the time to start scouring seed catalogs for planting ideas.

Herbs not only ad to culinary creations, but work synergistically to build our health. By planting healthy products, nurturing seeds, enjoying the transformation from a little seed to a viable plant…seed starting covers mind, body, and spirit.

Mother Judith

Tuesday, June 3, 2014

Oh, for the Love of Fruit!

 
I am being taunted, I am being gibed. The fruit on our trees are mocking me.
 
The lull is here. After a crazy month of berry harvest, we have a disturbing problem-no ripe fruit. Of course we have bushels of fruit on all the trees, but none of them are mature enough to eat.
 
Please hurry little fruit, I want to eat you.


Nancy Jane

Monday, April 7, 2014

Veggie Crunch!

 
Veggie Crunch Time Again
------Nutrient filled convenient food.
 
Some days more than others my body screams---pump up the volume for nutrients.

On those days I add more vegetable to the juicer than usual, but also make a batch of veggie-crunch—just as the name implies, tiny chopped up assorted vegetables.
 
A batch of veggie-crunch can be added to eggs, salad toppings, cottage cheese, topping of meat, it can even be added to a vegetable soup. KEG suggested adding to a taco or burrito----that girl is always thinking about her bean days.
 
If you have a food processor it is a breeze to whip up, store in refrigerator and just grab and add nutrients to various dishes.  If you don’t have one of these modern conveniences, grab your French knife and get a chopping.
 
*SIDE NOTE*
 Food processors should be a must have in every kitchen.   While most of us do not have servants to tend our kitchens, modern appliances can take their place, making it easier and quicker to produce great quality health building foods for our families----no excuses, appliances are not that expensive, just cut back on dining out a couple times and you will have enough for a healthy building, convenient investment.  But save enough money to purchase good quality items, cheap brands are just annoying and don’t have a long life span, and most of the time hard to clean.
 
Back to veggie-crunch---spring just awakens the taste level and creativeness of the concoction.  This morning we have some extra Easter Egg radishes Nancy Jane grew, our herbs are just at the waking up from winter stage, which makes them extra flavorful.  Use whatever leftover vegetables you have.  We are also adding some peeled garlic, shredded cabbage (not used for Chinese chicken salad), cauliflower, celery a little jicama, which we have not used before----hope it does not discolor. Use any veggie that does not wilt or turn brown.  Lettuce & spinach bruise to easily, but kale and collard greens are hardy enough for this concoction.
 
It seems no matter how I want to slow down, spend more time homemaking…puttering in the kitchen, cleaning, sewing and of course gardening. God has other plans for me.   I cherish every minute I am able to feather my nest… but have many outside duties so this vegetable technique is so handy when I return home to grab and add to whatever meal we are eating.   Nutritionally strong meals are essential for building healthy bodies, it takes a little time and planning, but it can be done, and worth building strong families.
 
Mother Judith

Saturday, March 8, 2014

Open-Faced Rustic Berry Pie


The King Arthur Flour Baker's Companion defines rustic as "the method of shaping the crust". I define it as "well, the edges of my crust did not turn out as pretty as I wanted".

Open-Faced Rustic Berry Pie is the easiest pie I have made up to this date. (Granted, this is not a well seasoned baker here). Basically all you do is roll out the dough, toss the berry mixture in the middle, fold over the dough and you made a pie!   The recipe is originally from the book, but with a few modifications.

Ingredients
Preheat oven to 425° F.
Take aluminum foil on cookie sheet, spray with oil. Roll pie crust flat on sheet. (The edges might hang off, this is ok). Set aside.

In a separate bowl, stir together sugar and cornstarch. Add berries. I opted for strawberries and raspberries since they were on sale. Stir ingredients together. Poor in middle of pie crust, leaving a 3 inch gap between berries and pie crust edge. Fold the dough over the berries, leaving a 4-5 inch hole exposing berries.
Steps for folding over dough.
 
Place in oven, bake 20-30 minutes, or until berry mixture begins to bubble and crust turns brown. Let cool for 15-30 minutes, serve with a scoop of ice cream and a cup of coffee!

I am so very looking forward to my berries this summer so I can make this pie with them.
Hope you enjoy the recipe!

Nancy Jane

Monday, February 24, 2014

Pick Up the Beat With Pickled Beets


Yes, we are still in beet mode. We just can't help it. Not only are they in season, we just plain love them. Pickled beets are one of my dad's favorite foods, so I really enjoy making them for him.
 
Pickled Beets (recipe from The Ball Blue Book)
Yields: about 6 pints or 3 quarts
  • 3 quarts beets (about 24 small beets)
  • 2 cups sugar
  • 2 cinnamon sticks
  • 1 tablespoon whole allspice
  • 1 1/2 teaspoon canning salt
  • 3 1/2 cups vinegar
  • 1 1/2 cups water
 

First step is to clean and boil the beets. You take raw beets, remove the leafy part and place in a large pot full of water. Boil beets until soft. I tested it by sticking a fork through it.
 
Raw beets
 

I had to use two pots, a couple of my beets were huge!

After being boiled.
 
 
After the beets are boiled, set aside to cool off a bit. While the beets are cooling, combine all ingredients (except beets) in a large saucepan. Bring the mixture to a boil, once boiling, reduce to simmer. Let simmer for 15 minutes.
 
While mixture is simmering, remove skin from beets, and slice beets to desired size.
 
Once the 15 min is over, remove the cinnamon sticks from mixture. Pack beets into sanitized jars, leave a 1/2 inch headspace.   


After packing beets in, ladle hot liquid over the beets, leaving 1/2 inch headspace. Remove air bubbles, add two-piece cap. Process the pints and quarts 30 minutes in a boiling water canner.

It's that easy! If you have a pickled beet recipe, please share!


Nancy Jane

Friday, February 21, 2014

Savory No-knead Pumpkin Bread


Savory, yet with hints of pumpkin pie, this bread will quickly find its way to your regular baking repertoire. It is so incredibly easy to bake, family members won't believe how you made it so quickly. However, advanced planning is needed due to the long rising processes. I typically start this bread the night before because it does take so long to rise. 

This recipe was in the Fall 2013 Heirloom Gardener Magazine. I was in the midst of harvesting my fall pumpkin crop that month and was obsessed with finding fun pumpkin recipes, and this caught my eye! The great thing about this recipe is you can interchange different ingredients. The first time I made this bread, I used white flour. Today, I used whole wheat flour. Don't be afraid to experiment, just make sure the ratios stay the same.

The BEST cinnamon to use for this recipe is King Arthur's Vietnamese Cinnamon. Seriously, you need to get this spice. You will never go back to the other stuff.

Pumpkin Bread
  • 2 1/4 cups bread flour (white or whole wheat work well)
  • 3/4 cup spelt or kamut flour
  • 1 1/4 teaspoon salt
  • 1/2 teaspoon active dry yeast
  • 1 teaspoon cinnamon
  • 1/2 teaspoon nutmeg
  • 1/4 teaspoon ground cloves
  • 1 cup puréed pumpkin or butternut squash (I have yet to try this recipe with butternut squash)
  • 3/4 cup cool water
  • Pumpkin seeds

Reserve pumpkin seeds for later use.
 
Combine all dry ingredients in large mixing bowl. Mix thoroughly.
 
Take water and puréed squash, mix together in separate bowl. Add to dry ingredients and stir with a rubber spatula. Stir until thoroughly mixed. (The dough will not be like any other bread you've made-this will be much wetter and will not form a ball.)
 
Cover the bowl with plastic wrap and let sit at room temperature, out of direct sunlight for 12 to 18 hours. (I usually do this step the night before I intend to bake it.)
Before the 12 hour rising.
 
 
After 12 to 18 hours have passed, your dough should be dotted with bubbles and more than doubled in size. Dust a wooden cutting board with bread flour and, using plastic dough scrapers, scrape dough loose from sides of the bowl and turn out onto board in one piece. Dough will be loose and sticky, but do NOT add more flour. Dust top lightly with flour and cover with a clean lint-free cotton or linen tea towel. Let dough rise for another 1 to 2 hours.
After the 12 hour rising.
 
Getting the dough ready for the second rising.
 
 
About 30 min before the second rise is complete, place a cast-iron Dutch oven (a 3 to 4 quart size is best, but larger size can be used) on a rack positioned in the lower third of oven. Heat oven to 450°F.
 
Once the oven has reached 450°F, remove the pot using heavy duty potholders (be very careful, the pot and oven will be extremely not). Sprinkle coarse meal at the bottom of the pot. Or, we put aluminum foil in our pot. 
The dough in the Dutch oven before I put the pumpkin seeds on it.
 
 
Uncover the dough and, using two plastic dough scrapers, shape dough by folding over onto itself a few times. With scrapers, lift dough carefully and let it fall into preheated pot. Dust the top of the dough with pumpkin seeds. Cover the pot with lid and bake for 30 minutes.
 
After 30 minutes, remove the lid from the pot and continue baking for additional 15 min, or until loaf is nicely browned.
After baking for 30 minutes, remove the lid.
 
 
Remove the pot for oven. With a sturdy spatula, lift loaf from the pot and transfer to a cooling rack. Do NOT slice bread for a minimum of 1 hour--this cooling time completes the process and shouldn't be overlooked! 
 
This bread can be served with butter or cream cheese. I also love putting homemade apple cinnamon butter on it, so delicious!!
 
Please share your experience making this bread.  
 
Nancy Jane

Saturday, February 15, 2014

Let's Talk Tomatoes


Image via http://www.preservingyourharvest.com/TomatoJarLabels.html
Tomato, tomato

     By any other name is not the same----so many varieties

Let's talk tomatoes.
 Seasoned tomato growers have their favorite.

Mr. Moore formerly of Moores Roses in Visalia grew Ace tomatoes---and gave a plant away for each rose purchased, encouraging all to grow and eat Ace tomatoes.

Some gardeners are partial to big Beefsteak tomatoes, we lean toward tomatoes with a bit more acid, plus none of us want to wait that long to eat, and so many times the big tomato gets just right for picking….and a bird beat us to it...

 Through the many years of growing tomatoes our choices are clear and unanimous---well almost, my husband still has a prejudice towards cherry tomatoes, but he is coming around.

Our favorites and highly recommended tomatoes.

  • Cherry Tomatoes

I don’t really have a name of a favorite, as long as they are round…an inch to two inches in size and red. No mini, oval, or grape shaped, or any other color than red.

These are great to pop in your mouth in the garden, or carry in a plastic sack for travel snacks, and take to the movies (although my husband will vehemently disagree with this movie snack).

You have to pop the whole tomato in your mouth, or it will squirt juice and seeds----kids think this is funny, and be sure if you have them for a movie snack to pop the whole tomato in you mouth, or just imagine where the seeds will end up.   Mother Judith does not especially like it when the seeds end up on ceiling.

Cherry Tomato Lore at Gray’s Farms can continue for pages, but time to move on.

  •  VF Hybrid Tomatoes from Burpee.

Early producers, large crop, perfect meat and acid balance, medium size.  Sentimental at Gray’s Farms, the first tomato my husband & I grew together decades ago.  For years we could not find seeds, since they are hybrids seeds cannot be saved, but this year, well I keep checking the mail for a fresh packet.

  • Health Kicks from Burpee

A wonderful plum-like shaped tomato with a good balance ---for both cooked sauces and eating fresh.   According to Burpee, these are healthier for you, packed with 50% more lycopene---we like them because they are delicious.    Small growing bush with lots of production--- some years the company runs out of these seeds, while we can have a huge bounty of other tomatoes and my husband will lament how he misses Health Kicks…..I understand his pain, never, ever having a tomato season without cherry tomatoes, it would be a great loss for me, but for sure not a great loss for my husband.
 
  • Brandy Wine Heirloom (widely available)

We could easily get on the heirloom garden wagon with this variety.  The best fresh and canned tomato we have ever grown.  I do not have the talent to describe how a canned Brandy Wine Tomato not only tastes , but reminiscent of summer gardens. 

But lets not discount the pure pleasure of eating a fresh Brandy Wine tomato, the flavor, the texture,  the aroma is an entire experience it is like eating a slice of summer.

As many heirlooms, be advised they do not have constancy of as modern hybrid tomatoes.   One year we will have a bumper crop and the next pickings can be very slim.   Shapes will vary, we think this is part of the character of the Brandy Wine----part of the fun of growing them-----even with the gliches that can occur, Brandy Wine tomatoes are always on our tomato planning list.

Theses are our top four tomatoes, but each year one of us usually will try something new, usually an Early Girl due to the early harvest, maybe a Beef Steak or Ace----but that is the fun of gardens each year, enjoying the old standard must haves, and trying something new.

The most important part of any harvest at our house is our family working together, aside from my husbands unnatural adversity to Cherry Tomatoes. We have fun prepping the ground, confirming we have the correct varieties, planning the planting, weed control and water-----watching the plants grow, checking for production and problems, the traditional first tomato of the year (after the cherries, again he does not count these),  eating produce for breakfast, lunch and dinner----using our annual recipes, I can go on and on how our garden  cultivates family activity….not to mention a great opportunity to just Praise and Thank God for the bounties of this Planet.

Mother Judith

Wednesday, February 12, 2014

Delicious Kale Chip

Before

After
 

Kale chips

  • Kale
  • Salt
  • Olive oil
  • Spices....I use dry Ranch Dressing from Penzeys  (yes another great product from this company with many uses)
Directions:
Wash kale....dry thoroughly ...
Spray or brush lightly with olive oil.
Sprinkle with salt and chosen spices.
Place in low oven or dehydrator until crispy.
Note: these are so good, but not as good as store bought. We do not use a lot of salt on our chips....the more salt the better they taste. So if salt is not a problem for you, pour it on and experiment with spices chosen. Obviously for us the spicier the better.
 
This is a great snack for travel, Nancy Jane and even KEG coveted mine when we were on a long road trip through the Mojave desert. Yes eventually I shared, and yes they enjoyed every morsel. So much so we did not make one fast food trip on this road trip. We ate healthy, had energy, a lot less annoyance and tons of laughter.
Mother Judith

Saturday, February 1, 2014

Cilantro Pesto


The Ingredients for Cilantro Pesto:
  • Raw Cilantro....one bunch ...slightly trim stems
  • Raw Garlic..1-2 cloves...depending on taste
  • Lemon juice from one lemon (maybe two again depending on size)
  • Dash of salt, to taste
Place in food processor and process
Keep Jars handy in refrigerator.
Great on eggs, omelets, salad toppings, tacos, burrito...mmmmmm getting hungry thinking about it...but great way to build nutrients in meals.
 
 
Mother Judith

Friday, January 31, 2014

Beet Notes, Part II


Easy, make aheadable, delicious, and vey importantly...pretty.

Shredded raw carrots
Shredded raw beets
Chopped up fresh herbs, (we use mostly cilantro or parsley because we always have it on hand)
Crushed garlic
Salt to taste
Rice vinegar

No measurements, the ratio of beets and carrots depends on what's available.

Combine first five ingredients, mix with rice vinegar, enough vinegar to cover all ingredients-more can always be added. Excess vinegar can be used for bread dipping.

You see, easy! Advance prep, simple, and we love pretty food...it makes us smile.

Mother Judith

Thursday, January 30, 2014

Beet Notes


Beet season is upon us......what do you do with an abundance in the garden, seeing the delightful displays of freshly picked beets at the farmers market, or if your husband, as in our case, gets a hankering for beet juice brings home a huge box of beets......plenty.

Beets make great juice, but combine it with other vegetables because they are potent, and high in sugar content..if you don't eat allot of sugar.....straight beet juice will give you a sugar high you try to avoid.....but mix with carrots and kale.....it is great.

Cheaters Beet Pickles
My favorite pickled beet pickle recipe is in Ball's Canning Cookbook.....since it has sugar I just don't take the time to make them any more....my family eats plenty of sugar.  Some ladies at the Red Hat Society (we gave a for tea one year) raved about their "Cheaters Beet Pickles".
Boil or roast beets until tender...cut in pieces...(this is when you use your crinkle knife). Place in sweet pickle juice jar.......they claim they are wonderful...if you try it let me know.

Check back with us, more of our traditional beet recipes we enjoy at Gray's Farms soon to come. But for now, I need to start soaking flour in keifer to ferment overnight for delicious muffins tomorrow, morning chores and off to our mission field.......K.E.G.'s therapy......what a blessing, God has blessed us with another day to glorify Him.......Thank you Lord for another day to serve you.

Mother Judith

Saturday, January 25, 2014

Veggifettie Confetti

Veggifettie is defined as no veggie left behind, that way no one feels out.

What are the ingredients of this specialty? Anything and everything that is a vegetable. It is the V8 of the solid food world. It is also called stealth health additions. You can add it in salads, sandwiches (not pb&j), in soups, eggs, meatloaf, on top of meats, tacos, burritos, burgers, pizza, any savory cuisine would benefit from the stealth health addition. The sky's the limit! Maybe not a hotdog...

I always know when Mother Judith is cleaning the fridge or gleaning the gardens because veggifettie is in the works.

Today's masterpiece included, but not limited to, broccoli heads and pealed broccoli stalks, garlic, peppers, carrots, beets, collard greens, and celery.

Here are the steps for making the veggifettie. The only equipment needed is a food processor.

First we put in the bell peppers.


Added the carrots, beets, garlic, and broccoli.

 
Finally the collard greens.

 
Blended it all together, and here are the results.

 
You can blend it to the desired chunk size.


No order needed, just toss it in the food processor.
 
You are not limited to veggies, you can also use herbs. We enjoy adding cilantro and parsley to the mixture, or whatever herbs we can find in the garden.
 
Once you are done, toss it in your food and enjoy.

 Nancy Jane & Mother Judith
<a href="http://www.bloglovin.com/blog/11607681/?claim=ttpyv48dkkh">Follow my blog with Bloglovin</a>