Showing posts with label seed starting. Show all posts

Friday, January 30, 2015

Jiffy Tomato Greenhouse Update No. 1


As the name entails, the tomatoes are thriving in the green house. They are sprouting tall...almost too tall as some are toppling over! I had to remove the lid of the greenhouse due to their height. Almost every pellet grew a tomato except for one!

On account of the lid being removed, the pellets are not retaining water as well. So frequent watering is required since the liquid is being evaporated so rapidly.

However, peppers are taking a tad bit longer to pop up. I peaked inside one of the pellets to see if there was any action, and the little guys are waking up. The ones that were planted two and half weeks ago are finally showing their tiny green heads, the other container planted a week ago has minimal action. Hopefully soon more will come.

So far the product has been quite successful. It works extremely well for tomatoes, I would definitely recommend this product for anyone starting those seeds. The peppers are not as prosperous yet, although I am getting some results.

I'll be continuing to update you all on my new way of starting seeds.

Spring is on the horizon, soon my little vegetable babies will be cradled in the warm soil basking in the sunlight.

Nancy Jane

Monday, January 19, 2015

The Jiffy Tomato Greenhouse Review


Months ago Mother Judith remembered my dream of having a beautiful greenhouse. She granted my wish with a mini greenhouse; I thought it was so funny and so useful!


Finally seed starting time has begun for my zone (perhaps we're a little early, but we just can't wait). I am use to starting seeds in egg cartons, so I felt a bit fancy shamncy beginning my little ones in this product. Nonetheless, the mini greenhouse is great for gardeners of all levels and couldn't be easier!

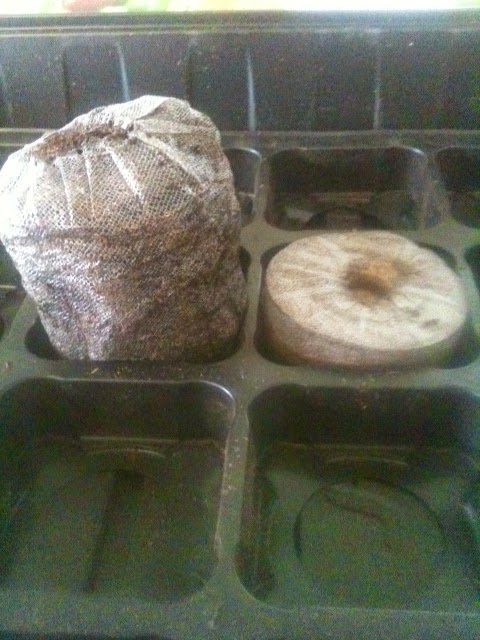
Product Detail: Jiffy Tomato Greenhouse. It contains 36 peat pellets, a large plastic tray holds 36 pellets and a rectangle dome lid. The tray and lid act as the greenhouse. The peat bricks expand once soaked. You can find them at Walmart with various size options, from 25 to 70! 


First, you need to submerge the peat pellets in water for about 30 minutes in a separate container and wait for them to expand. Be sure to check the water level often; before you know it the water will be absorbed and your little pellets will not have any water left to soak in. 


When finished, you will find the peat soft and luscious; a perfect atmosphere for your little seeds to grow in. If the top of the pellets are still a little stiff and crumbly, you'll need to soak it a little longer. And the size it grows to is quite shocking compared to where it started!


After this step is done, place lose pellets back in container. Pull back netting, poke the seeds in, and cover with peat. Place the dome lid over plastic container, and wait for them to grow! I have a multitude of tomatoes growing that were only planted 5 days ago!


Here are the ups and downs I've experienced with the mini greenhouse

Upside:
  • Easy to maintain while seeds are growing. The peat keeps moisture very easily, thus minimal watering.
  • Peat keeps an optimum seed starting atmosphere.
  • Easy to tell when watering is needed; the pellets will no longer be black but light brown.
  • Minimal mess when planting. The peat does not get all over the place.
  • No extra equipment needed, all is provided for you (except seeds and containers to soak bricks in).
Downside:
  • When you place the lid on top of container for multiple days, the water does not evaporate easily and it sits in container. Fungus will begin to build up on pellets, so frequent fungicide spraying is necessary. Another remedy is to let the green house sit open to air out for a few hours.
  • Time consuming. Unlike other methods where you easily scoop soil into cartons, these take a while to prepare.
All in all, it has been a good experience using the mini greenhouse. I would recommend it for the well seasoned gardener to the first time seed starter! 

Nancy Jane

Saturday, January 17, 2015

Johnny's Seeds Herb Disk Collection


New product trial; Johnny’s Seeds Herb Disk Collection. Each disc has herb seeds of your choice strategically placed on a cloth like disc.


The disks can be purchased separately or with the proper size pot.

They offer:
  •  Cilantro/Coriander
  •  Chives
  •  Parsley
  •  Thyme
  •  Genovese Compact Improved Basil
  • Arugula
Simply place the white disc on top of seed or potting soil. 

Using the pots Johnny's Seeds sells, we fill ¾ way with potting soil, a couple inches of Burpee Brick seed starting mix, place the discs in pots, top with vermiculite, and sprinkle with more Burpee seed starter.


At Gray’s Farms we get planting fever in January, so we started ours early and keep the seeds cozy with warming mats. However, if you are in hibernation mode wait until spring to plant.

Either way, now is the time to start scouring seed catalogs for planting ideas.

Herbs not only ad to culinary creations, but work synergistically to build our health. By planting healthy products, nurturing seeds, enjoying the transformation from a little seed to a viable plant…seed starting covers mind, body, and spirit.

Mother Judith