Showing posts with label Garden. Show all posts

Friday, January 30, 2015

Jiffy Tomato Greenhouse Update No. 1


As the name entails, the tomatoes are thriving in the green house. They are sprouting tall...almost too tall as some are toppling over! I had to remove the lid of the greenhouse due to their height. Almost every pellet grew a tomato except for one!

On account of the lid being removed, the pellets are not retaining water as well. So frequent watering is required since the liquid is being evaporated so rapidly.

However, peppers are taking a tad bit longer to pop up. I peaked inside one of the pellets to see if there was any action, and the little guys are waking up. The ones that were planted two and half weeks ago are finally showing their tiny green heads, the other container planted a week ago has minimal action. Hopefully soon more will come.

So far the product has been quite successful. It works extremely well for tomatoes, I would definitely recommend this product for anyone starting those seeds. The peppers are not as prosperous yet, although I am getting some results.

I'll be continuing to update you all on my new way of starting seeds.

Spring is on the horizon, soon my little vegetable babies will be cradled in the warm soil basking in the sunlight.

Nancy Jane

Wednesday, January 28, 2015

Greens, Greens, Nothing but Greens

"Green, greens, nothing but greens: 
Parsley, peppers, cabbages and celery,
Asparagus and watercress and 
Fiddleferns and lettuce-!"
Into The Woods-Prologue


Ah, Winter Greens. Kale, Swiss Chard, Pok Choy, Collard Greens, Spinach, and so much more flourish in the cold winter months. And your color pallete is not limited to merely green, there is also purple Kale and rainbow Chard! 


The seeds are tossed into the ground while the earth is still warm in the middle of Autumn so one can continue to enjoy gardening well into winter's core. 

Often times the little plots are exploding with an excessive amount of greens, and the gardener is always left trying to find new ways to use them.

One of my favorite Winter foods is soup, and greens are a much welcomed addition to it. The best way I've found to add them in the pot is just before you serve. The leaves and stems will quickly cook up in the hot broth. Mother Judith recently made a Kale soup with chicken apple sausage and some other veggies. So delicious.


Another dish greens are great in is stir fry. Similarly with soup, wait until the rest of the veggies are cooked up then toss in the greens. Pok Choy is a must for the cuisine--make sure to include the stems! They soak in the onion and garlic flavors, which is simply divine. The last batch I made included Pok Choy and a red Swiss Chard leaf (The leaf was huge and I was only cooking for two, so one leaf sufficed).


Pok Choy stems all chopped up.
You can see the colorful stem of the Swiss Chard.
The easiest way to enjoy them is in a salad. Each leaf has a different texture and flavor that can be drowned out in other dishes; so enjoy their natural flavors while they are raw!

Do you have special ways you cook them? Please share!

Nancy Jane

Saturday, January 24, 2015

My Spray Painting Addiction


One of my Christmas gifts from the family was this cute flower pot holder! It was originally blackish gray, so Mother Judith made a suggestion to spray paint it to a spring time color to add some extra pop to my patio. I took the tip and ran with it!


Moss green was a must, however, I didn't want it to be one solid hue. While scouring the spray paint aisle lavender caught my eye! I love the way the tints mesh with the flowers.

So now an obsession (and problem) has been born, I'm always on the hunt for new items to paint.

Next project--my new lawn chairs from the 1940s. Can't wait to get to work on them!

Nancy Jane

Wednesday, January 21, 2015

Sweet Pinot Noir Pepper


You read that right, a Pinot Noir Pepper.

No it is not wine that tastes like pepper, or a pepper that tastes like wine. It's a delicious produce that all will surely enjoy! 

We grew this variety for the first time last year and the plants flourished. If you are looking to add a new pepper to your garden, you should give this one a try.

The pepper begins in a light green hue when young and matures into a variety of colors; including berry, citrus, and cherry red (though my crop mostly grew berry with a few reds). The size of the peppers vary, I had both big and small ones. If you would like to grow mostly large ones, the peppers can be thinned. 

It does very well in slightly hot weather, but as soon as it gets over 100 degrees Fahrenheit the crop slows down slightly. The peppers continued to produce well into December and only stopped because we finally got a frost!


When cooked the flavor feels hot, but does not have that spicy kick. This appeals to me since my taste buds cannot handle the spiciness. 

You can purchase the seeds at Burpee's Seeds and start them at home! 

We highly recommend this variety; it will soon become a staple in the your Summer kitchen. Pinot Noir peppers add great flavor to omelets, fajitas, quiches, pizzas, stir fries, and anything else you can think of! 

Hope you give this pepper a try! 

Nancy Jane

Monday, January 19, 2015

The Jiffy Tomato Greenhouse Review


Months ago Mother Judith remembered my dream of having a beautiful greenhouse. She granted my wish with a mini greenhouse; I thought it was so funny and so useful!


Finally seed starting time has begun for my zone (perhaps we're a little early, but we just can't wait). I am use to starting seeds in egg cartons, so I felt a bit fancy shamncy beginning my little ones in this product. Nonetheless, the mini greenhouse is great for gardeners of all levels and couldn't be easier!

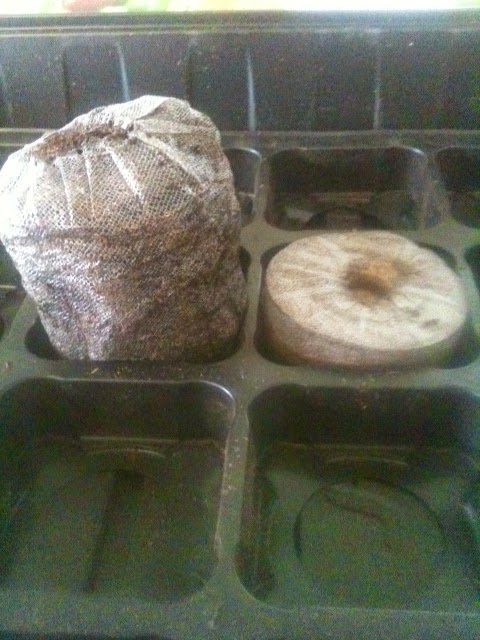
Product Detail: Jiffy Tomato Greenhouse. It contains 36 peat pellets, a large plastic tray holds 36 pellets and a rectangle dome lid. The tray and lid act as the greenhouse. The peat bricks expand once soaked. You can find them at Walmart with various size options, from 25 to 70! 


First, you need to submerge the peat pellets in water for about 30 minutes in a separate container and wait for them to expand. Be sure to check the water level often; before you know it the water will be absorbed and your little pellets will not have any water left to soak in. 


When finished, you will find the peat soft and luscious; a perfect atmosphere for your little seeds to grow in. If the top of the pellets are still a little stiff and crumbly, you'll need to soak it a little longer. And the size it grows to is quite shocking compared to where it started!


After this step is done, place lose pellets back in container. Pull back netting, poke the seeds in, and cover with peat. Place the dome lid over plastic container, and wait for them to grow! I have a multitude of tomatoes growing that were only planted 5 days ago!


Here are the ups and downs I've experienced with the mini greenhouse

Upside:
  • Easy to maintain while seeds are growing. The peat keeps moisture very easily, thus minimal watering.
  • Peat keeps an optimum seed starting atmosphere.
  • Easy to tell when watering is needed; the pellets will no longer be black but light brown.
  • Minimal mess when planting. The peat does not get all over the place.
  • No extra equipment needed, all is provided for you (except seeds and containers to soak bricks in).
Downside:
  • When you place the lid on top of container for multiple days, the water does not evaporate easily and it sits in container. Fungus will begin to build up on pellets, so frequent fungicide spraying is necessary. Another remedy is to let the green house sit open to air out for a few hours.
  • Time consuming. Unlike other methods where you easily scoop soil into cartons, these take a while to prepare.
All in all, it has been a good experience using the mini greenhouse. I would recommend it for the well seasoned gardener to the first time seed starter! 

Nancy Jane

Saturday, January 17, 2015

Johnny's Seeds Herb Disk Collection


New product trial; Johnny’s Seeds Herb Disk Collection. Each disc has herb seeds of your choice strategically placed on a cloth like disc.


The disks can be purchased separately or with the proper size pot.

They offer:
  •  Cilantro/Coriander
  •  Chives
  •  Parsley
  •  Thyme
  •  Genovese Compact Improved Basil
  • Arugula
Simply place the white disc on top of seed or potting soil. 

Using the pots Johnny's Seeds sells, we fill ¾ way with potting soil, a couple inches of Burpee Brick seed starting mix, place the discs in pots, top with vermiculite, and sprinkle with more Burpee seed starter.


At Gray’s Farms we get planting fever in January, so we started ours early and keep the seeds cozy with warming mats. However, if you are in hibernation mode wait until spring to plant.

Either way, now is the time to start scouring seed catalogs for planting ideas.

Herbs not only ad to culinary creations, but work synergistically to build our health. By planting healthy products, nurturing seeds, enjoying the transformation from a little seed to a viable plant…seed starting covers mind, body, and spirit.

Mother Judith

Tuesday, January 13, 2015

Welcome Blooming Home


We weary travelers were welcomed home late at night with fresh cut flowers from the gardens.  Nancy Jane had them scattered in little spots throughout the house; each time I saw them my heart smiled.
 
For K.E.G.’s healing, traveling to clinics is needed.  The therapy is out of town and it is an intensive session of six hours a day of physical therapy…it is worth every minute—
 
But traveling during busy garden season can be disquieting. However, returning home to a counter of freshly picked tomatoes, zucchini, and crook neck squash plus surprise vases of flowers is good for a gardener's spirit.
 
Garden reunion is such a delight during the prime season.  The roses are blooming again, daisies are bursting, echinacea in pinks and whites….. yes the weeds are a bit overwhelming, but what better way to exercise after a week of watching K.E.G. workout. 

A lady I met while traveling told me in Italy they say the weeds are good for the garden…this year I am pulling that good for the garden card.
 
Winter returns from travels are just as welcoming, a fresh jar of paper whites greeted us this past trip; the pansies and violets are full of color. 
 
Fruit & nut trees are a sleep for the season, but this time of year the weeds add color; even though I know in back of my mind the hula hoe will be doing its job.
 
Traveling during garden season is not a choice I would make, but after spending so much time in the city, surrounded by homogenous malls, restaurants, and the chain stores, all cities are starting to look the same.  This confirms my life blessing of being in the most remarkable area in the world, with life growing and producing.
 
Know a traveling gardener? Nothing says home like a vase or jar full of flowers, herb, ferns, or a bouquet of precisely placed twigs.
 
Welcome Blooming Home


Mother Judith

Thursday, August 21, 2014

Guarding the Rose


Why do you instantly feel like a fancy lady when you look at a rose?

They're not stuck up, heavens no! They are seamlessly elegant, as if they could glide on ice.

Their scent is sweet and delicate, and they look so beautiful on the bush or arranged in a vase.

But be careful of those harsh thorns! They will protect their lovely blossoms from enemies.

Be like a rose, protect your beautiful heart from evil thoughts. Guard yourself with thorns, only let positive and good thoughts into your heart.
 
Keep your heart with all vigilance, for from it flow the springs of life.
Proverbs 4:23
 
Nancy Jane

Friday, August 15, 2014

I Talk to Plants


I talk to plants. Does this make me crazy? Perhaps, but here are some really good reasons why I speak to my plant children.
  1. They're good listeners. You can tell them all about your cares and woes.
  2. They don't complain about the hair cuts you give them. You accidentally slightly over cut a rose branch? That's ok, it'll grow back! Well, unless you really over cut, then we have a problem.
  3. Plants will not judge your singing, so go ahead and perform your favorite hymn for them!
  4. Oh those weeds you haven't gotten to yet? Well, your garden won't even notice. The plants are just so pleased to see you that they don't even care about the weeds. However, be sure to get to them eventually, a garden's patience only lasts for so long.
  5. The joyous reception one gets from the garden is so nice that one can't help but to be happy. Nothing better than getting a bunch of smiling flowers staring and listening to you!
The Lord gave us gardens to lift our spirits and bring happiness in our lives. Don't forget to talk to your plants, they love hearing from you!

Nancy Jane

Saturday, August 9, 2014

How to Freeze Pesto!

As a child, pesto was this foreign green stuff that looked absolutely disgusting! My eyes judged before I tasted it. It was green, it was all liquidy, it looked weird.

It wasn't until college when pesto was given a chance. The sauce was one of the first cuisine purchased when I moved to Los Angeles. With no experience living away from home, I became a lost puppy. While meandering down a grocery aisle trying to figure out what to buy, a frozen package of noodles and pesto caught my eyes. As soon as I was back at the dorm, I cooked it up. From the first bite to the last, my eyes were opened to the heavenly dish. Oh my word, these taste memories still float in my head. Of course, the whole bag was devoured...and I wonder how those sophomore 20 pounds showed up...

As my taste buds evolved, now homemade pesto is a must! I use fresh basil from the garden. Italian works the best, however, Thai and Opal work well. Word of warning, the Opal basil alone as pesto looks odd, might make a good Halloween dish!

Italian, Thai, and Opal Basil.
You can use any recipe for freezing, but here is the one Mother Judith and I prefer.
  • 1/3 cup olive oil, plus a little extra
  • 1 cup chopped basil leaves
  • 1/2 cup chopped walnuts
  • 3-4 garlic cloves, diced
  • 2/3 cup grated parmesan cheese
  • Salt to taste
Once ingredients are prepared, combine all ingredients in blender, blend until smooth, or you reach desired texture. Stop to scrape sides every once in a while. I don't mind a little lumps in my sauce.


Seriously, pesto is not photogenic.
Once pesto is made, pull out a sheet of wax paper, place on cookie sheet. Scoop heaping tablespoon of pesto and place on wax paper. You will get about eight scoops.


Not the most beautiful thing to photograph...

Stick the cookie sheet in freezer and let set for a day. When pesto is frozen, you will see how easy it is to peel them off. Place all of them in Ziploc bag, release all the air, and freeze until you want to use them! They keep for about a year.
 
 
When you want to use them, I found it best to let it thaw in a bowl, then use it. It just makes life easier and quicker!
 
The great thing about making pesto is the aroma! Washing dishes has never smelled so good!

Hope you find this useful! It's a great way to keep enjoying your summer herbs year round.

Nancy Jane

Tuesday, August 5, 2014

Gray Girl Garden Chili


Poe photo bombed our picture.
This started out as mom's chili, but K.E.G and I borrowed it and made it our own. Every Tuesday night is bean night at the Grays. It's a tradition that has lasted through the years, and no matter how many times we eat them, I cannot get enough of those beans!

When Mother Judith and Dad first got married, they were trying to be economical and stay within a budget. Thus, they ate beans. It took many a pots of beans to please the man's palate, but Mother Judith finally did it. My cousins use to call it "Uncle Rick's Beans" because there was always a pot ready for them when they came over.

Through the years, they expanded their cuisines, and beans were eaten a lot less. Soon, the beans were lost in culinary memories. Fast-forwards a few years, bean night found itself back on the kitchen counter! The only person who really liked them at the time was K.E.G. The first meal Mother Judith made for K.E.G's return home from the hospital was beans. She could not eat them, but MJ thought the smell would welcome her home and reawaken memories.

Now the bean tradition has expanded to regular chili night's made by K.E.G and myself. After Tuesday night beans, we always have some left over! So we started making the chili!

It is called a garden chili because you can add whatever is in season into the chili. This summer we added zucchinis, fresh tomatoes, fresh onions, and peppers from our plots to the crock pot. This recipe is flexible, just add whatever else you want!

Gray Girl Garden Chili:

Core Recipe
  • 1 lb ground beef, cooked
  • 2 cups diced onions
  • 3 cloves, chopped
  • 1 1/2 cup corn
  • 14 ounces tomato paste, canned or made fresh. Here is the recipe.
  • 3 cups of cooked beans 
  • Salt and pepper to taste
Today's add-ons:
  • 2 cups chopped zucchinis
  • 1 1/2 cup diced tomatoes
Combine in a crock pot, or pot, and let cook for a few hours, or until hot. It will start off looking too thick, but will eventually thin out. Add cheese and enjoy! For a real treat, pour chili over Fritos, add cheese, and you got yourself a Frito Boat! You will not regret eating it!


The chili will never taste the same each time you make it, which makes it fun! It's always a delicious surprise.

Nancy Jane

Wednesday, July 9, 2014

Easy Garden Fresh Tomato Paste


Are you enjoying the difficulty of not knowing what to do with all the tomatoes that are being harvested from your garden? Try making this easy tomato paste. We use just the plain paste for our garden chili (recipe to come soon for that). However, you can add garlic or herbs to the paste for more flavors and pizzaz!

Recipe:

First, clean off 17-20 tomatoes. You can use any variety, I happened to use Health Kick Plum tomatoes.

Now to easily take the skin off the tomatoes you will need to bring a pot of water to a boil, drop tomatoes in there and let sit in the boiling water for a minute. Then place tomatoes in a bowl of ice water.


When cool enough to touch, cut the top of the tomato and take skin off. It should easily be taken off. If not, you can always slice it.


Squeeze out seeds into bowl and place skinless tomatoes in blender.


Blend until smooth. There should be no chunks.


I don't mind any remnant seeds in my paste, but you can run paste through a colander to catch last of the seeds and chunks. Pour paste in jar and save in refrigerator for your next recipe!

It makes about 14 ounces, but you may have more or less depending on size of tomatoes.

If you want to make the paste thicker, simply cook it in a pot until the paste reaches your desired thickness.


The first thing I noticed about the paste was the color. It wasn't that bright red you find at stores, rather a fresh, soft red. Makes you think about all the chemicals they add to sauces to create the color!

Hope you enjoy the simple recipe!

Nancy Jane

Tuesday, July 8, 2014

Raise Your Branches


Mornings are the best time to view the garden. The plants are lifting their delicate arms to the sky as if to thank God for another day. I wonder what hymns they sing and what their voices sound like as they praise our heavenly Savior. Would the trees sing bass and the roses soprano? Would their chants be slow, fast, or both? If only we could be a part of their glorious choir as they bask in the warmth of the sunlight. 

All creatures of our God and King
Lift up your voice and with us sing
O praise Him, Alleluia
 
Thou burning sun with golden beam
Thou silver moon with softer gleam
O praise Him, O praise Him
Alleluia, Alleluia, Alleluia
 
Thou rushing wind that art so strong
Ye clouds that sail in Heaven along
O praise Him, Alleluia
 
Thou rising moon in praise rejoice
Ye lights of evening find a voice
O praise Him, O praise Him
Alleluia, Alleluia, Alleluia
 
Let all things their Creator bless
And worship Him in humbleness
O praise Him, Alleluia
 
Praise, praise the Father, praise the Son
And praise the Spirit, three in one
O praise Him, O praise Him
Alleluia, Alleluia, Alleluia
 
Praise, praise the Father, praise the Son
And praise the Spirit, three in one
O praise Him, O praise Him
Alleluia, Alleluia, Alleluia
-Ralph Vaughan Williams 


Nancy Jane