Monday, October 20, 2014

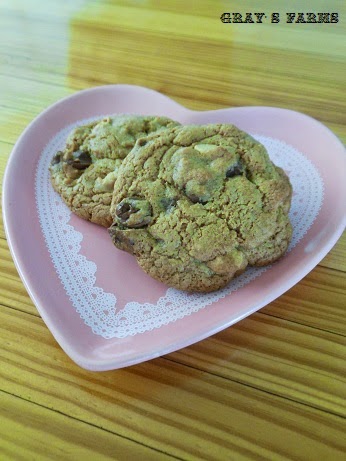
Caramel Filled Chocolate Chip, Peanut Butter Cookie


By the amount of ingredients listed in the title, you know it's going to be good. I've made them for a Bible study group, and they were a hit!

Inspired by a television show, How I Met Your Mother, I decided these cookies needed to be made. The character, lovingly dubbed as "The Mother", offers another character some cookies. They are named something a little unsavory, however, the way she described the pastry made me want to devour them.

This is my interpretation of the delicious inspiration; hope you enjoy them as much as we did!

Whole wheat flour is used in this recipe. It can easily be interchanged with white flour, however, I found the whole wheat added a unique flavor to it (and you can tell yourself it's healthier while you eat it...guilt free cookies! Haha)

While at Target, I discovered these lovely little guys; milk chocolate chips with caramel in the center. They work great for the recipe! Any brand of peanut butter chips will work, I grabbed Reese's because they were on sale...


Directions:

Preheat oven to 350° F.
Mix together:
  • 1 stick (1/2 cup) of soft butter
  • 1 1/2 cups of packed brown sugar
  • 2 teaspoons vanilla extract
  • 2 eggs
Mix until creamy, then add:
  • 3/4 teaspoon salt
  • 1/2 teaspoon baking soda
  • 1/2 teaspoon baking powder
Mix, then add:
  • 2 cups of Whole Wheat Flour or White Flour
After fully combined add:
  • 9 ounce bag of caramel chocolate chips
  • 8 ounces, or 1 cup, of Peanut butter chips
Once fully mixed together, scoop tablespoon size balls onto a well greased cookie sheet. Bake for 15-20 minutes, or until golden brown. Careful not to over bake the cookies, they are not as flavorful when over done.

Once cooled, serve with coffee or an ice cold cup of milk. These are great to eat in front of a warm fire place with your favorite hot drink.

The cookies will surely be a hit! I'm not making them for a while purely because I can't stop eating them!! Hope you enjoy them as much as my taste buds did!


Nancy Jane

Saturday, October 18, 2014

Crock-Pot Pumpkin Butternut Squash Chili


I enjoy making a batch of this Chili every Autumn. It is super hardy for those cold evenings (though, we have yet to experience a crisp Fall night yet this year!). The dish is delightful when accompanied by fries, cornbread, or all by itself.

Ingredients:
  • 1 cup chopped onions
  • 2 tablespoons of taco seasoning
  • 2 cups butternut squash, peeled and cut into cubes
  • 2 cups pumpkin, peeled and cut into cubes
  • 1 cup corn- canned, fresh, or frozen
  • 2 cups cooked black beans- from the can or fresh
  • 2 cups diced fresh or canned tomatoes
  • 1 1/2 cups fresh peppers- I used bell peppers, but any variety will do
  • 2 cups chicken or veggie broth
Simply toss all the ingredients into a crock-pot and cook on low for 6-8 hours, stirring occasionally. When finished, serve with a side dish of your choice.

Hope you enjoy the Fallish cuisine!

Nancy Jane

Friday, October 10, 2014

Maple Walnut Pumpkin Cake


Fellow pumpkin enthusiasts, you will surely enjoy this cake. It is so cinnamony, pumpkiny, and mapley. The pastry is filled with a plethora flavors, it doesn't need frosting, a simple powder sugar topping will do.

The maple syrup brings a whole new divine twist. It's not overpowering, just a lovely sweet addition.

The cake is extremely easy to bake...and devour.

Ingredients:
  • 2 3/4 cup flour
  • 2 1/2 teaspoon baking powder
  • 1 teaspoon salt
  • 2 teaspoons ground cinnamon
  • 1 cup milk
  • 3/4 cup 100% pumpkin purée
  • 1 1/2 teaspoon vanilla
  • 1 cup maple syrup
  • 1 cup packed brown sugar
  • 2 large eggs
  • 3/4 cup soft butter
  • 2 cups chopped walnuts
Preheat oven to 375°F.

Except for brown sugar, combine dry ingredients in a bowl.

In a separate bowl, combine eggs, butter, and brown sugar. Mix in pumpkin purée, milk, maple syrup, and vanilla until completely mixed.

Pour dry ingredients into the wet ingredients, stir until the dry mixture is completely mixed into wet ingredients. Then add walnuts and stir.

Grease a cake pan and pour cake batter in it. Bake for 40-50 minutes, or until finished.

When cooled, serve with a fresh cup of coffee in your favorite mug. Hope you enjoy this Fall time treat!


Nancy Jane

Thursday, October 2, 2014

Get Spooky With Gum Paste Jack-o'-Lanterns


Add some spooktacular pizzazz to cupcakes with little Jack-o'-Latterns. They're 100% edible, cute, and a tiny bit scary. These little guys are festively adorable!
  
For the dye, I found this Halloween themed food coloring at WalMart; but, I'm sure you can find this at other stores in your area. Or simply buy black and orange food coloring!


This project also requires gum paste. You can find it at WalMart, Joann's, or Michaels. If you're getting it from the latter two, be sure to bring your coupons!


Step One:
You'll need:
  • Gum Paste
  • Orange Food Dye
  • Fondant Roller or Rolling Pin
  • Small Pumpkin Cookie Cutter
  • Container to store cut outs in
  • Powder sugar and corn starch combined for dusting
IMPORTANT: Gum paste easily dries up when exposed to air. Be sure to cover unused gum paste in plastic wrap or place in Ziploc bag.
 
Pull out a chunk of gum paste, about the size of a golf ball.


Place orange dye on ball and roll until completely mixed in. Add more orange until it is the color you want.


Get out a roller. I use this 9 inch fondant roller from Wilton, it is small and easy to handle. It also has rings on it so you can consistently get the correct thickness. I use the purple rings for this project. But a rolling pin will work just fine. 
Side note: If the gum paste is too sticky, lightly dust the powder sugar and corn starch mixture onto it.


Roll out gum paste, about 1/8 inch thick.


Take pumpkin cookie cutter and cut out as many pumpkins as you wish.


Set aside and let dry over night in an open container. 


Step Two:
After the gum paste has hardened, now we can apply the faces! You can either purchase pre-made black frosting, or make your own!

You'll need:
  • Frosting
  • Round Icing Tip, Size 2
  • Icing Bags
  • Black Dye
  • Water
First, you will need icing. I used White Decorator Icing, which can be found at WalMart, Joann's, or Michaels. 


To thin out the icing, simply add a teaspoon of water at a time until you achieve the correct consistency. To test the thickness of icing, place a spoon in the bowl and see if the frosting is able to hold up the spoon. If not, then it is the perfect thinness. If you accidentally add too much water, its ok! Add a little powder sugar to fix the problem. 

Before water:

After water:

The icing will not be able to hold the weight of the spoon.

When soft, add black dye. This took a lot of coloring, and it kept photographing purple! 


When you get your desired color, fill an icing bag while the tip is already in the bag. Do a test run on to make sure everything is working properly.


Wipe off tip, place a pumpkin on counter and make a triangle for an eye. Fill in triangle, then repeat. Make a mouth, and voila! You have a Jack-o'-Lattern.


Have some fun and make a whole little family!


Let the frosting dry, takes about a couple of hours. Place on cupcakes, then enjoy!


Nancy Jane