Wednesday, April 30, 2014

Dance Around the May Day Pole

Come dance with us around the May Pole, where streams of rainbows flow.
 

 May Day Memories &
      Mom's Lesson of Giving

Over fifty years ago my family lived in a little neighborhood in Inglewood Calif.  Such memories of neighborhood friends, ice cream truck, a little lady named Helen who lived alone we would go visit. This little neighborhood was where mom in her kind and gentle ways taught me to be caring for people, kind to animals, (even snails) and May Day we gave secret flower gifts.

Mom saved strawberry baskets, which were cuter back then, not plastic but a thin wood.  We would weave ribbon in the little slits, and use a pipe cleaner for a handle,  scour our little yard for flowers and sometimes a cute rock to fill our craft work.

On May Day, I would go around the neighborhood (not forgetting the little lady Helen) and leave them on the doorstep, a secret gift never to be known who was the deliverer.

This was mom’s introduction to non-recognition giving. Giving to bless, not for applause.

The tradition carried on for many years with my own beloved daughters, and maybe we should revisit it now. Mom’s wisdom was not my artful flower decoration, but an introduction to give and bless others.

Thank you Mom…Happy May Day…May Day is even more beautiful in heaven

Mother Judith
 

~How to make May Day Poles~
Perfect gifts to add along to bouquets of flowers. I (Nancy Jane) have precious memories of creating these colorful gifts with Mother Judith and K.E.G. each year before May Day.

What you need:
  •  Bamboo Sticks
  • Three Choices of Ribbon
  • A Fake Flower
  • Hot Glue Gun
Step 1: Choose two ribbons to be wrapped around the bamboo stick. With your ribbon choices, measure the length of bamboo stick and add a few inches. Glue ribbon A and B to top of stick on opposite sides, weave ribbon tightly to bottom of stick. Wrap and glue at bottom.


Bamboo stick after being wrapped by ribbon.

 
Step 2: Take your three choices of ribbon, measure the length of bamboo and cut ribbon. Glue ribbon A, B, and C on top of bamboo. With your fake flower, glue to the top of the stick. Now, with the extra ribbon, make a bow out of each color and glue around the top of the stick.


Now you are finished! It's that easy!


Use them as gifts, decorations, or a fun way to teach children about May Day!


Do you have any May Day memories? Please share them with us!
 
Nancy Jane


Monday, April 28, 2014

Rockstar Barbequed Fries


During the long hot days of Summer, the last thing the cook wants to do is warm up the house with the oven! However, this family enjoys our burgers with a nice side of potato goodness. To solve this battle of either warming up the house to have fries, or keep the house cool and have no fries, we use the barbeque. It becomes an essential cooking tool in the Gray household.

These healthy fries are simple to make, however they do take a while to cook. It takes around an hour for them to finish, but it's well worth the wait. They can be barbequed by themselves or simultaneously with a steak or burger. You do not need to babysit the fries while they are cooking. Just turn on the timer and work on other project!

This recipe is for a party of four. Feel free to add or reduce the amount of potatoes and spice.

*side note* It calls for red potatoes, but we found purple and white potatoes at Costco, so we included them in this batch.

What you need:
  • 5 Red Potatoes (or any other potato about the size of a fist)
  • 2 tablespoons olive oil (another option is garlic olive oil-it adds extra flavor to the dish)
  • 1/2 teaspoon garlic salt
  • 1/4 teaspoon pepper
  • Foil (non stick works best)
  • Barbeque
"Preheat" the barbeque, turning burners on to medium. Cut potatoes into desired size, put in bowl. Add olive oil, garlic salt, and pepper, stir until potatoes are well covered.


Take 10-12 inches of foil and place on countertop. If you do not have non-stick foil, be sure to spray it with Pam.

Pour potatoes on foil.


Keep potatoes in the middle of foil. Add another piece of foil on top, fold sides TIGHTLY! This step is so so important. You will be flipping over the foil and you want to make sure the potatoes don't spill out.


Open barbeque, carefully put potatoes on top shelf and close lid. Let cook for 20 minutes.


After 20 minutes are up, cautiously lift lid. If it has been closed for full 20 min, there will be a wave of heat. Using a spatula, place the foil covered potatoes on bottom shelf and flip over. I use tongs to help out. Place back on top shelf with spatula. Cook for another 20 minutes. After that time is up, flip again using the same process. Open the top layer of foil with tongs and let cook opened for another 15-20 minutes.

 
Grab some ketchup, and enjoy!


A great part of the recipe is the potatoes will absorb the taste of the well seasoned barbeque. I prefer this recipe over oven roasted fries because of this. I am looking forward to making these all through the barbeque season! 
 
Nancy Jane


Friday, April 25, 2014

Calming Lavender Oil


Some nights I put a few drops of Lavender oil on a pretty doily and keep in my pocket or under my pillow, someplace accessible and close enough to slightly smell the fragrance.

In the middle of the night when wandering thoughts creep in my mind, I pull it out, smell the fragrance, say a prayer and thank God for providing simple pleasures such as Lavender oil.

This also is so calming throughout the day. God has provided us with so many healing elements, we just have to take a step back and get in harmony with them.


Lavender Oil is a fantastic Mother's Day gift. You can purchase it here, she will love it! Don't forget the doily.

Mother Judith

Wednesday, April 23, 2014

Spiritual Scraps

Scraps from meals belong in the compost pile, spiritual scraps should never be stretched out to your husband.
 
 
Don't give your spiritual scraps to your husband.
 

We wives are pulled in so many directions; children, aging parents, medical community, schools, friends, jobs, volunteering. (Gosh,  I am getting a little tense just listing them all—I can imagine how the reader's nerves are fairing.) 

This list sadly excludes our husbands. On top of that, where on the list is prayer, worship, communing with our heavenly Father?  Even sadder.

While God may be short changed in the busy life of a wife and mom; husbands also feels the lack of spiritual fruits, even if it is the culls. I can humbly admit that there have been days when he did not get the scraps of the fruit of the spirit, but a mega-portion of the flesh.


No spiritual Scraps here, only beauty.
  

That is when it is time to ask for forgiveness, (even more humbling). So humbling that I have learned it is easier to use my last ounce of self control being kind and gentle than apologizing for an outburst later. Then regroup my lifestyle, and remember God did not put me on the Earth to be a workhorse (an angel would work much better than me). However, we are to serve Christ. We are to live a spiritual life being blessed with a partner and nurturing our children towards Lord. That cannot be accomplished being frazzled and exhausted.

Lord, help me be your servant, and give my husband the first fruits each day—not giving him my unfulfilling scraps.
 
Mother Judith

Monday, April 21, 2014

Baked Egg Rolls


This family loves egg rolls, but often the ones we purchase at restaurants are fried and full of grease. Mother Judith has developed a healthier egg roll that is baked, not fried.
 
This recipe is time consuming, so we recommend completing it throughout a couple of days. I broke it up into steps to show you how we completed each stage.  However, the great thing about these is you can make them ahead of time and freeze for future events.
 
We encourage you to make these egg rolls with friends or family. You will enjoy the fellowship and team work that is involved with the process. Plus, it gets the work done a lot faster!
 
What you need:
  • Veggies (list is below)
  • Sesame Seed Oil
  • Black Pepper
  • Melted Butter
  • Soy Sauce
  • 1 Package of Filo
  • Olive Oil
  • Wok
  • Baking Pan
  • Parchment Paper
 
Part One, Veggies:
Choose what vegetables you wish to have in the egg rolls. This is what we had, but you are not limited to it. You can cut the veggies up the day before cooking to save time and energy. I shredded the cabbage 3 days before we made this batch and Mother Judith chopped the other veggies the day before.
  • Grated Carrots, 2 cups
  • Chopped Snow Peas, 3 cups
  • 1 Head of Shredded Cabbage
  • Sliced Mushrooms, 2 1/2 cups
  • Whole Bean Sprouts, 3 cups
  • Chopped Celery, 2 1/2 cups
  • Chopped Parsley, 3 tablespoons
  • Chopped Water Chestnuts, 2 1/2 cups
  • Chopped Bell Peppers, 2 cups
  • Diced Onions, 2 cups
  • Diced Garlic, 3 tablespoons
  • Diced Ginger, 2 tablespoons
Feel free to add or subtract ingredient measurements. This is extremely flexible recipe. If you have left over veggies after you make the egg rolls it works for stir fry or soups!


Part Two, Stir Fry:
Stir fry INDIVIDUALLY the cabbage, snow Peas, mushrooms, celery, water chestnuts, and bean sprouts in olive oil to desired doneness. I preferred a little crunch, so we didn't cook the veggies all the way through. Pour into large bowl. Then add garlic to wok, then after a few seconds add ginger. Cook until you smell the garlic. Proceed to add one remaining group of uncooked veggies at a time until all are in wok. Add a touch of sesame seed oil and pepper to taste. After you have reached desired doneness, add to the big bowl. Add a couple tablespoons of soy sauce to mixture and stir veggies together.
 

Pretty colors, this tastes so good alone too.


Step Three, the Filo:
This is the particular product we use. You can find it in the frozen section at your local grocery store.
 
 
Take Filo out of package.


Cut Filo in half.

 
You will see that the Filo is paper thin. While you are working with one half of the Filo be sure to put a wet paper towel over the other half.


Take one layer off, place on counter. Spread melted butter on it. Take another layer and place on top. Add more butter. Take another layer and place on top of other two. Add more butter. If some layers are ripped, add another layer to help make sure the veggies do not fall out in holes.

 
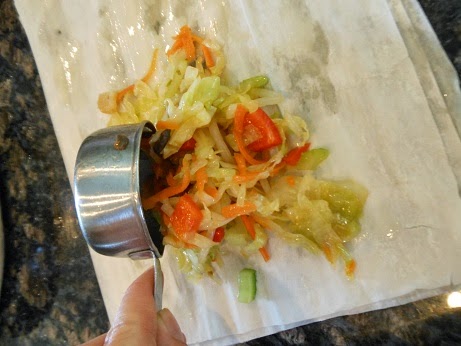
Using a 1/3 cup measuring cup, poor a heaping scoop onto top of Filo.


Then fold as shown below. It's almost like folding a burrito.


Keep buttering it up! (A little butter never hurt anyone.)


Keep folding and adding butter...


You will end up with around 26 egg rolls. Again, save the extra stir fry veggies for other meals. 
 
Step Four, Storage and Baking:
Place on pan covered with parchment paper. At this point you can either place egg rolls in Ziploc bag and stick in the freezer for later or preheat the oven to 350°F and bake for 20-25 minutes or until golden brown. Take out of oven and enjoy!


Serve with your favorite Chinese Cuisine, or eat with a salad like we did.
Hope you enjoy these egg rolls as much as we did!
 

Mother Judith & Nancy Jane 

Thursday, April 17, 2014

A Travel Pick-Me-Up: Bragg's Organic Apple Cider Vinegar All Natural Drink


Bragg's Ginger Spice Organic Apple Cider Vinegar All Natural Drink is a favorite at Gray's Farms. It is sugar free and made with their World famous Bragg organic apple cider vinegar. Other ingredients are: pure distilled water, organic stevia extract, and organic ginger.

This drink is not only delicious, but a great go to for traveling. No need to haul around a jug of apple cider vinegar when this is available. It's a great alternative to sodas or any other sugary drinks.

We highly recommend this beverage. Other flavors include Grape Acai, and Apple Cinnamon. You can find Ginger Spice online or at Sprouts Market.

Wednesday, April 16, 2014

Our Favorite Herbs: Chives

Herbs grow obsessively and abundantly in our gardens. Some are set on taking over Mother Judith's garden (along with the blackberry vines) and some grow in buckets. We can never have too many herbs! They add so many nutrients and tastiness to our meals.

I wanted to highlight varieties we have in our gardens so that you might get inspired to buy your own. In honor of my personal favorite, we're are going to start with chives!

We have two varieties growing; common and garlic. Both have distinguished flavors.


Chives, Common are the most prolific of all the varieties. The taste is similar to onions and they produce pretty little purple flowers, which also happen to be edible. I can't get myself to eat the flower though, they are too darn cute!


Chives, Garlic have a garlicy onion taste. The tender and flat leaves produce little edible white blossoms in late summer. (Don't tell chive common my secret, but this variety is my favorite.)

A gardener should grow both of these varieties since they add different but delicious flavors to your culinary master pieces. Chives are in the allium family which includes leeks, onions and garlic. The plant is also an incredibly easy to grow perennial. After the danger of frost is gone, pop the seeds in a plot of ground with access to full sunlight. Water and watch them take off! Chives are also tough in the Central Valley Summers and Winters. They stand tall to the many days of 100° weather. The plant does shrink into hiding during the frost, but returns with full glory when the weather is nice again. Watch out for gophers though, they enjoy eating chives too! You can easily use a pot when growing the plants to avoid this issue. These are incredibly fun and simple herbs to grow, perfect for the beginning gardener.

The health benefits that are associated with chives include:
  • Anti-cancer properties. They contain some antioxidants that fight against free radicals and help fight back cancer tumors.
  • Helps your body digest food better. The plant decreases the amount of yeast, bacteria, and fungi found in your intestinal track.
  • Chives are a rich source of vitamin K which help limit the amount of neurological brain damage and could help promote bone health.
You can add the plant raw into salads, eggs, sandwiches, or burgers. If you are adding them to soups, stir fry, or any hot dishes, make sure to insert them in the last minutes of cooking to help keep the flavor. I also love putting chives on pizza, it adds the extra punch of sparkle the dish needs!

Hope my fellow gardeners have or plan to include chives to your land. You will not regret it!

Nancy Jane

References:

Monday, April 14, 2014

Kool-aid Easter Eggs

Easter would not be the same without an egg dyeing party. K.E.G and I invited one of our dear friends over for the event! The fiesta itself was a blast, we ended up creating eggs that look like stones and dinosaurs eggs.

I kicked off the party by balancing a bowl of dozen eggs on the sink and having them all fall! Of course every single one cracked, but I personally think it added some flair and pizzazz to them. I really know how to get a party started!

This year we decided to experiment and colored our eggs with Kool-Aid! We added 2 packages of Kool-Aid to 8 ounces of water.

 
We enjoyed a cup of coffee, a nice batch of homemade strawberry scones and fresh homemade strawberry jam.


The gnome decided to hang out with us.

 
The Kool-aid made the water so bright and colorful.


Redish-brown eggs.

 
The purple ended up black, so I would use less of the purple Kool-Aid next time.

 
We made a mess.

 
Careful, while the egg is drying it's easy to scratch off the dye.
This white spot kind of looks like a dog.
 
 
You can see the cracks.

 
More messiness.

 
Finished product.

 
The eggs turned out to be a unique color. Next time I would fix the ratio of Kool-Aid to water to create more colorful eggs. I tend not to eat the eggs after I dye them, so if you do eat them watch out. I heard the egg does not taste very good after being colored with Kool-Aid.
 
With cracks and all, we had a jolly good time!
 
Nancy Jane