Thursday, August 28, 2014

Apple, Butternut Squash, & Chicken Crock-Pot Curry


Autumn is around the corner, and we are enjoying harvesting our Autumnish produce! With apples and butternut squashes profusely growing, we are still trying to find ways to use them! Curry seemed like a good idea, and boy was I right!

Indian food is one of my fiancé's and my favorite cuisine. There is a hole in the wall restaurant we frequently dine at, however, due to less then flattering events happening at the place, our attendance has lessened. In order to quench our Indian food cravings, I've been searching for a replacement.

This recipe is on the sweeter side, no spiciness; which is perfect for me. And did I mention how easy the recipe is? It's so simple!

Ingredients:
(This feeds two people, just double recipe for a family of four)
  • 1/2 cup chicken broth
  • 1 can (13.5 oz) unsweetened coconut milk
  • 2 chicken breasts, diced into chunks
  • 1 cup diced apples
  • 2 cups diced butternut squash
  • 3 garlic cloves, chopped
  • 3/4 cup chopped onions
  • 2 tablespoon sweet yellow curry
  • 1/2 teaspoon garam masala, optional
  • 1 1/2 teaspoon salt
  • 1-2 tablespoons whole wheat flour.
Except for flour, combine the ingredients into crock-pot.


Set lid on top and cook on high for 6-8 hours. After the 6 hours is up, the curry may be too liquidy. Simply add flour to the curry and it will thicken.

Serve with jasmine brown rice or quinoa. Then enjoy while watching the leaves turn into a rainbow of colors.


Nancy Jane

Wednesday, August 27, 2014

How to Dehydrate Fresh Herbs


My poor basil plant faced a serious emergency, its little branch broke. Thus leaving me with a bunch of perfectly fine basil leaves.


Really, this wasn't a big issue because I've had a plethora of ideas set for the plant. Storing the herb for winter use has been a priority of mine since it is a key ingredient in many recipes we enjoy. Lately the choice of storage has either been pesto, or drying the leaves for sauces! So I collected the little branch and went to work!

This technique works for almost any herb, and couldn't be any easier! There are a lot of ways to dry herbs, nonetheless, we prefer this technique due to the lack of bug issues.

Directions:
What you need:
  • Dehydrator
  • Herbs of your choice
Collect herb leaves, be sure to use ones without bug holes in them.


Place leaves in bowl and let soak. After soaking, pour leaves in colander, finish washing off, then lightly towel dry. Place leaves on dehydrator trays.


Let dry for 4-6 hours, or until leaves are crispy.


Sometimes a majority of the leaves will dry, leaving you with some still a little wet. You can choose to store the already dried ones and continue to dehydrate the others, or freeze the remaining damp leaves in a Ziploc bag.

To store the leaves you can leave the leaves whole, or crumble them in a mason jar for easy use.


We add the dried herbs to not only pasta sauces, but to sautéed veggies, dipping oil, soup, and Chile Verde sauce. It is just so tasty, and obviously full of flavor! You can make one jar for each herb, or combine the herbs to make special mixes! Basil and oregano is an old favorite of ours.

Hope you all can store your fresh herbs this summer for winter meals!

Nancy Jane

Friday, August 22, 2014

The Virtuous Pre-Wife, Part 3

He proposed to me under this tree.


For those who do not know, I recently got engaged to my ruggedly handsome man. I am so excited to spend the rest of my life with him!

Love my man!
As I excitedly wait for this new adventure in life, I find myself pondering about being a wife. Now moving forward to a new season; no longer waiting on the Lord to bring me a husband, but wondering how to be a Godly wife. How can I apply being a Proverbs 31 woman while engaged?

An excellent wife who can find? She is far more precious than jewels. The heart of her husband trusts in her, and he will have no lack of gain.
Proverbs 31:10-11
 
Singleness is spent on being single for the Lord. While it is still very important to live my life for the Lord, however, being engaged means it is no longer just about me. What I do with my life does not only affect me anymore. What can I do to be more precious than jewels for my future husband? What characteristics do I need to build upon?


To find out we need to look upon real life examples of Virtuous Wives.

Luckily, Mother Judith and my future Mother-in-Law are fantastic examples of the Proverbs 31 wife. Both were given different paths by the Lord, and both follow this path faithfully. They work, yet keep the house clean. They raised their children to follow the Lord, and to serve the Lord. Both create inviting homes for their husbands to come home to after a long day of working in hot Central Valley Summers.

She looks well to the ways of her household and does not eat the bread of idleness.
Proverbs 31:27

They do not eat the bread of idleness.

As a single woman we can look at similar ladies as examples, however, it is even more important as an engaged woman. I want to create a cozy home, warm meals, and a loving space for my future husband.

Ask yourself during the time of engagement what traits you need to grow, and begin to work on them! Oh, I have so many flaws! I will be quite the work in progress, however, the Lord is on my side.

The next year shall be an adventure and I look forward to it. I cannot wait to marry my man!

Nancy Jane

Thursday, August 21, 2014

Guarding the Rose


Why do you instantly feel like a fancy lady when you look at a rose?

They're not stuck up, heavens no! They are seamlessly elegant, as if they could glide on ice.

Their scent is sweet and delicate, and they look so beautiful on the bush or arranged in a vase.

But be careful of those harsh thorns! They will protect their lovely blossoms from enemies.

Be like a rose, protect your beautiful heart from evil thoughts. Guard yourself with thorns, only let positive and good thoughts into your heart.
 
Keep your heart with all vigilance, for from it flow the springs of life.
Proverbs 4:23
 
Nancy Jane

Tuesday, August 19, 2014

Inspirations

Are there little things in your life that get you going? Sometimes for me it's knowing that tiny baby plants are starting their little lives in my garden. Their petite arms are stretching out of the ground, reaching up to the Heavens.


Other times it's knowing that no matter the situation, the Lord is watching over me.

Oh Lord, you have searched me and know me!
You know when I sit down and when I rise up; you discern my thoughts from afar.
You search out my path and my lying down and are acquainted with all my ways.
Even before a word is on my tongue, behold, Oh Lord, you know it altogether.
You hem me in, behind and before, and lay your hand upon me.
Psalm 139:1-5 
 
What inspires you in the morning before you rise?
 
In the morning, when I rise
In the morning, when I rise, give me Jesus
Give me Jesus,
Give me Jesus,
You can have all this world,
But give me Jesus.
-Fernando Ortega
 
Nancy Jane

Sunday, August 17, 2014

Two Faced Cookie!


Oh you two faced cookie, why are you so sweet?!

So buttery, sugary, and chocolaty, double chocolaty. And chock full of nuts!

A cookie with two delicious personalities! One chocolate chip, the other double chocolate chip! You will not be able to pick a side because you will love each one equally.

If there is a need to feed a bunch of men, I highly recommend these cookies. 9 out of 10 men loved them. My dad was the only one who didn't, but that was because Snickerdoodles were available and those are his favorite. So out of default we did not get that 10th approval. However, he did enjoy them.

Recipe:
  • 2 cups flour
  • 1 teaspoon baking soda
  • 1 teaspoon salt
  • 1 cup softened butter
  • 1/2 cup granulated sugar
  • 1/2 cup brown sugar
  • 1 teaspoon vanilla extract
  • 2 eggs
  • 1/4 cup cocoa powder
  • 1 1/2 cups chopped walnuts or pecans
  • 1 bag of chocolate chips
Preheat oven to 375°F. Mix flour, baking soda, and salt. In a separate bowl beat butter, both sugars and vanilla extract. Add eggs and beat again. Add flour mixture, chocolate chips, and nuts to this bowl and mix until well combined.


Now separate the cookie dough into two different bowls. Add cocoa powder to only one bowl. Mix until fully combined. The mixture might be thicker than other dough, this is fine.


Prepare a cookie sheet, scoop 1/2 teaspoon sized ball onto sheet of tan mixture, then black mixture next to it.


Lightly squeeze together.

 
Then repeat!
 
 
Place in oven and let cook for ten to twelve minutes.


When finished, let cool. Then enjoy!


Nancy Jane

Friday, August 15, 2014

I Talk to Plants


I talk to plants. Does this make me crazy? Perhaps, but here are some really good reasons why I speak to my plant children.
  1. They're good listeners. You can tell them all about your cares and woes.
  2. They don't complain about the hair cuts you give them. You accidentally slightly over cut a rose branch? That's ok, it'll grow back! Well, unless you really over cut, then we have a problem.
  3. Plants will not judge your singing, so go ahead and perform your favorite hymn for them!
  4. Oh those weeds you haven't gotten to yet? Well, your garden won't even notice. The plants are just so pleased to see you that they don't even care about the weeds. However, be sure to get to them eventually, a garden's patience only lasts for so long.
  5. The joyous reception one gets from the garden is so nice that one can't help but to be happy. Nothing better than getting a bunch of smiling flowers staring and listening to you!
The Lord gave us gardens to lift our spirits and bring happiness in our lives. Don't forget to talk to your plants, they love hearing from you!

Nancy Jane

Tuesday, August 12, 2014

Candied Ginger Apple Cake


It's about this time of the year I get the hankering to bake this cake. Our apples are being plucked from the branches, and the recipe is the perfect use for them.

Candied Ginger Apple Cake is such a treat I typically make it once or twice a year. Gotta keep it special! My taste buds can't get enough of it, and it's a great transitional recipe from Summer to Autumn.

This year K.E.G. helped me bake, it's always a lot more fun to bake with a buddy!!


The apples you use is up to the baker. I used Pear Apple and other varieties from the fruit orchard because of the overflowing abundance we have been blessed with this Summer.

The recipe only needs one bowl, so clean up is a breeze! Which is good news to this particular baker.

Recipe:
  • 2 ¼ cup all purpose flour
  • 2 cups brown sugar
  • 2 teaspoons baking soda
  • ¾ teaspoon salt
  • 1 teaspoon cinnamon
  • ½ teaspoon cloves
  • 8 tablespoons soft butter
  • 4 tablespoons candied ginger
  • 4 cups diced peeled apples
  • 2/3 cup chopped walnuts
  • 2 large eggs
Preheat oven to 350°F. In a large mixing bowl, combine flour, brown sugar, baking soda, salt, and spices. Cut in butter, then ginger, apples, nuts, and eggs. Mix until blended. It will be a very thick batter.


Pour into well greased pan or into cupcake papers. Bake for 45-50 minutes, or until finished. If the top bakes faster than the rest, simply add a piece of foil on top of pan.

Finished Product
A simple frosting pairs well with the cake since it is so sweet alone. Or a delicate caramel sauce would be delectable.


Here is the cake I made two years ago with caramel frosting. So delicious, with hints of Autumn and Summer. Oh man, I wish I had a slice in front of me now! Hope you enjoy the cake!


Nancy Jane

Saturday, August 9, 2014

How to Freeze Pesto!

As a child, pesto was this foreign green stuff that looked absolutely disgusting! My eyes judged before I tasted it. It was green, it was all liquidy, it looked weird.

It wasn't until college when pesto was given a chance. The sauce was one of the first cuisine purchased when I moved to Los Angeles. With no experience living away from home, I became a lost puppy. While meandering down a grocery aisle trying to figure out what to buy, a frozen package of noodles and pesto caught my eyes. As soon as I was back at the dorm, I cooked it up. From the first bite to the last, my eyes were opened to the heavenly dish. Oh my word, these taste memories still float in my head. Of course, the whole bag was devoured...and I wonder how those sophomore 20 pounds showed up...

As my taste buds evolved, now homemade pesto is a must! I use fresh basil from the garden. Italian works the best, however, Thai and Opal work well. Word of warning, the Opal basil alone as pesto looks odd, might make a good Halloween dish!

Italian, Thai, and Opal Basil.
You can use any recipe for freezing, but here is the one Mother Judith and I prefer.
  • 1/3 cup olive oil, plus a little extra
  • 1 cup chopped basil leaves
  • 1/2 cup chopped walnuts
  • 3-4 garlic cloves, diced
  • 2/3 cup grated parmesan cheese
  • Salt to taste
Once ingredients are prepared, combine all ingredients in blender, blend until smooth, or you reach desired texture. Stop to scrape sides every once in a while. I don't mind a little lumps in my sauce.


Seriously, pesto is not photogenic.
Once pesto is made, pull out a sheet of wax paper, place on cookie sheet. Scoop heaping tablespoon of pesto and place on wax paper. You will get about eight scoops.


Not the most beautiful thing to photograph...

Stick the cookie sheet in freezer and let set for a day. When pesto is frozen, you will see how easy it is to peel them off. Place all of them in Ziploc bag, release all the air, and freeze until you want to use them! They keep for about a year.
 
 
When you want to use them, I found it best to let it thaw in a bowl, then use it. It just makes life easier and quicker!
 
The great thing about making pesto is the aroma! Washing dishes has never smelled so good!

Hope you find this useful! It's a great way to keep enjoying your summer herbs year round.

Nancy Jane

Tuesday, August 5, 2014

Gray Girl Garden Chili


Poe photo bombed our picture.
This started out as mom's chili, but K.E.G and I borrowed it and made it our own. Every Tuesday night is bean night at the Grays. It's a tradition that has lasted through the years, and no matter how many times we eat them, I cannot get enough of those beans!

When Mother Judith and Dad first got married, they were trying to be economical and stay within a budget. Thus, they ate beans. It took many a pots of beans to please the man's palate, but Mother Judith finally did it. My cousins use to call it "Uncle Rick's Beans" because there was always a pot ready for them when they came over.

Through the years, they expanded their cuisines, and beans were eaten a lot less. Soon, the beans were lost in culinary memories. Fast-forwards a few years, bean night found itself back on the kitchen counter! The only person who really liked them at the time was K.E.G. The first meal Mother Judith made for K.E.G's return home from the hospital was beans. She could not eat them, but MJ thought the smell would welcome her home and reawaken memories.

Now the bean tradition has expanded to regular chili night's made by K.E.G and myself. After Tuesday night beans, we always have some left over! So we started making the chili!

It is called a garden chili because you can add whatever is in season into the chili. This summer we added zucchinis, fresh tomatoes, fresh onions, and peppers from our plots to the crock pot. This recipe is flexible, just add whatever else you want!

Gray Girl Garden Chili:

Core Recipe
  • 1 lb ground beef, cooked
  • 2 cups diced onions
  • 3 cloves, chopped
  • 1 1/2 cup corn
  • 14 ounces tomato paste, canned or made fresh. Here is the recipe.
  • 3 cups of cooked beans 
  • Salt and pepper to taste
Today's add-ons:
  • 2 cups chopped zucchinis
  • 1 1/2 cup diced tomatoes
Combine in a crock pot, or pot, and let cook for a few hours, or until hot. It will start off looking too thick, but will eventually thin out. Add cheese and enjoy! For a real treat, pour chili over Fritos, add cheese, and you got yourself a Frito Boat! You will not regret eating it!


The chili will never taste the same each time you make it, which makes it fun! It's always a delicious surprise.

Nancy Jane

Monday, August 4, 2014

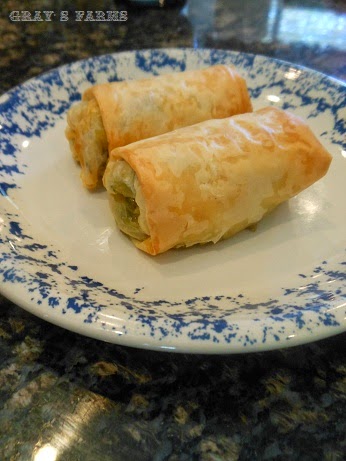
Super Delicious Garden Egg Rolls


Zucchinis! What a problem they cause for us. They grow so plentiful, almost too plentiful. Gardeners are stuck with this the issue every year, what are we going to do with all these zucchinis?!

How about trying Super Delicious Garden Egg Rolls? We were able to utilize the veggie in this delightful dish!  It is stuffed with healthy produce, and the buttery Filo adds a delectable touch.

Be aware, you will need extra time making these. They are time consuming due to the multiple steps required to complete the dish. However, if you break up the steps throughout the week it will be a breeze.

Ingredients:
  • 8 cups shredded zucchini
  • 1/4 cup chopped raw cashews
  • 2 cups chopped celery
  • 1/2 cup chopped chives
  • 1 cup chopped bell peppers
  • 1 cup shredded carrots
  • 1 cup chopped water Chestnuts
  • 1 minced garlic cloves
  • 1 tablespoon minced garlic
  • 2 cups chopped mushrooms
  • soy sauce
  • Olive oil
  • 2 boxes of Filo
Step 1:
Shred zucchini, place in colander and drain.


To make sure the zucchini is drained add salt to zucchini and mix. Place colander in large bowl. Put a plate on top of shredded zucchini and set weights on top. Let drain for at least a 1/2 hour. You will notice all the liquid draining from the colander.


Step 2:
After the zucchini is drained, set aside. Sauté all the other vegetables in wok, do a little bit at a time in olive oil. Place cooked veggies in colander and let drain. Finally sauté the remaining zucchini and combine with other veggies. 

 
Step 3:
Pull out Filo, cut in half. While you are not using part of the stack, be sure to place a wet paper towel over Filo.

 
Pull out three sheet of Filo and butter in between each sheet.


Place 1/4 cup of veggies onto base of Filo.


Roll Filo like a burrito. Frequently buttering after each turn.


Place egg roll on parchment paper. Bake egg rolls at 350. If you are planning to freeze them for later, we recommend baking first, then freeze. We experienced soggy egg rolls after letting them sit in the freezer without baking.


After baking, enjoy with sweet and sour sauce or with our favorite Hot Mustard Sauce!
 
In a small bowl place 1/4 cup of dry mustard in it. While stirring, add 1/4 cup of cold water, continue to stir until mixture is smooth. Stir in  1/8 teaspoon of olive oil. Cover and let stand for about an hour.
 
Hope you enjoy the summery dish that freezes well into the late months of dreary winter!

 
Nancy Jane